Saturday, December 19, 2009

Throwdown Time!!


Christmas is almost here and that means it's time for another throwdown.  This years throwdown ingredient, rice.  The rules, according to niece Shae: Must use rice in the recipe.  I like it, short, sweet and keeps big sis from finding ways to cheat. 

I did my final trial run last weekend for Sunday Dinner and thought I would give everyone a sneak peak.

I'll have to reread the rules but I fairly certain I followed all the rules of the throwdown. Let me see, must include rice, check, I did that.  I think I'm good to go.

Watch out I'm ready and playing for keeps this time.

And just in case you're not sure what I am making here is the recipe

Ingredients:
Rice

Directions:
Cook

Good luck to all.

Saturday, December 12, 2009

Ice Cream with Cranberry Syrup


We all have vices and bad habits we would like to break and I am no exception.  Years ago I thought I drank to much soda with caffeine so I swore off caffeine for a few months and 18 years later and I still haven't had a sip of caffeine.  12 years ago I went a step further and swore off all kinds of soda and haven't had a sip since.  But there is one food item I can't quit and never will, ice cream.  I'll admit my weakness, I love the stuff, if I am ever on death row you can bet it will be part of my last meal if not the entire meal. 

I like just about any type, cookies and cream, cookie dough, moose tracks, I could go on and on, but my favorite overall is probably plain old vanilla ice cream.  You can do so many different things with vanilla ice cream, eat it plain or cover it with toppings.  Everyone has their favorite toppings, chocolate, carmel, nuts, and fruit  but I think my favorite all time topping is maple syrup.  Yep just maple syrup, simple. 

If you remember a few days ago I posted cranberry pancakes with cranberry maple syrup that I made.  Now here is an idea, how would that syrup go on some of that good Alden's Ice Cream we have?  Well I didn't really know but I knew I was going to find out.  It doesn't get much easier to make, start with some vanilla ice cream and top with the cranberry maple syrup and enjoy.
Turns out to be some pretty good stuff.  A while back the wife made some cranberry jam and now I know what I can use it on, along with some maple syrup of course.  That's one habit I will never break.

Thursday, December 10, 2009

Mongolian Beef and Shrimp


 I took an extreme right turn for this weeks Sunday Dinner Episode from where we have been for the last month or so.  This week we are taking a shot at chinese cooking.  Chinese food, one of my favorites, for some reason is one the the hardest types of food for me to cook.

 Back in the day when I used to work in Midland Michigan once a week or so we would go to one of the chinese restaurants in town.  Midland was fortunate to have two fine chinese restaurants, one being Pi's and the other China Palace.  It was a toss up for peoples favorite, mine is China Palace.  Whenever I went to the China Palace and didn't eat the buffet I would order either the mongolian shrimp or mongolian beef.  I loved the stuff and it is still my favorite of all chinese food.  Since I have left the Midland area and went to other chinese restaurants in other towns I have found out how hard it is to find mongolian beef or shrimp.  I did find mongolian beef at P.F Changs in Arlington Virginia but I have yet to find mongolian shrimp at any restaurant.

I have tried to duplicate the mongolian beef and shrimp recipe for the last three years with little luck.  It's been a few months since I tried so I thought I would give it another shot.  I searched the internet and finally came up with a recipe that is suppose to be the one P.F Changs use.  I did change it a little because the Mongolian meals I had at the Midland restaurants didn't have mushrooms.   This cast of characters are as follows.........

 Not a big cast this week and I like that. 

I followed the recipe below and I will admit I was a little disappointed when I finished.  The dish was good, it just wasn't what I was hoping for which is something close to the mongolian beef from the China Palace.

Next I thought I might as well try with shrimp and make a couple of changes.  First I decided not to to use the cornstarch and coat the shrimp.  Most recipes I find on Mongolian shrimp or beef use a light dusting of corn starch but I don't remember the mongolian shrimp at the China Palace having any type of coating.  The other change I made was to slice up a half of onion and cook with the shrimp.  I also added more ginger to the shrimp while it cooked but used the same sauce as the mongolian beef.  I should add I threw in a few red pepper flakes to kick it up a notch because after all mongolian shrimp can be a bit spicy at times.  What I ended up with was mongolian shrimp dish that is getting darn close to the China Palace one.  I think the ginger might be the difference.

 At the end of the day my search for the perfect mongolian shrimp or beef continues and maybe someday I'll find what I am looking for but until that day I think I may have found something close that I can use.

Mongolian Beef
  • 1 lb flank or skirt steak, sliced in thin strips
  • 1/4 cup corn starch
  • 2 tsp vegetable or peanut oil
  • 1 tsp fresh ginger, minced
  • 1 tbsp garlic, minced
  • 1/2 cup low sodium soy sauce
  • 1/2 cup water
  • 1/2 cup dark brown sugar
  • 1 cup vegetable or peanut oil
  • 1 bunch green onions, green part only, cut in half
 Dust steak pieces lightly in cornstarch and set aside while preparing the sauce. In a small sauce pan heat oil over medium high heat. Add ginger and garlic. Add soy sauce and water to the ginger and garlic before it browns. Add brown sugar and whisk until dissolved. Bring sauce to a boil and simmer about 10 minutes or until slightly reduced and thickened. Remove from the heat and reserve.

In a wok heat 1 cup oil over medium high heat. Working in batches, add the steak a few at a time to the hot oil. Cook about 1 minute without touching the meat then flip each piece and cook 1 minute more.

Remove meat while still rare inside, and continue with next batch. Once all meat is browned, pour off oil and wipe out skillet.

Add steak to the hot pan and cook about 1 minute. Add sauce to the pan and simmer and toss meat and sauce about 1 minute. Add green onions and heat 1 minute.

Serve over rice.

Tuesday, December 8, 2009

Jock's Roasted Corn Chowder


Every year I make a pot full of corn chowder.  I am a little late this year because I normally make corn chowder while corn on the cob is still fresh.  I can find corn on the cob all year round these days but its still not as good as late summer or early fall.  When I first made corn chowder I used frozen corn and there is nothing wrong with that, but for the last few years since corn is available on the cob I use that instead.  One reason I like to use corn still on the cob is I can roast the corn giving it a sweeter flavor.  Last year I roasted the corn on my charcoal grill but this year since I don't have my grill I roasted the corn in the oven.  It's still good from the oven but not near as good as when it comes off the grill.

First things first and we must introduce the cast of characters....

I do have one new member to this years cast and that is cheddar cheese.  I found a chowder recipe recently that used cheddar cheese and thought I might give it ago this year.  Other than that it's a pretty standard cast for corn chowder. 

Everyone has their favorite way to make corn chowder and so do I.  I like my thick, the thicker the better.  I also like lots of potatoes in mine.  I use russet potatoes because after they cook they start to break down and make the soup even thicker, just be careful because you will end up with mash potatoes if you aren't careful.  Some people like their chowder thinner and if that's you I suggest to cut back on the butter/oil, flour and use either red potatoes or yukon golds, they hold up better to the cooking process.


You can also make corn chowder by replacing the milk with chicken broth and then using a pint of cream or half and half at the end of cooking.  That will give you a little lighter chowder but still pretty flavorful.  What this all comes down to is it is your chowder make it as you please.

You can also change this to a vegetarian dish by omitting the bacon but in my opinion all good things start with bacon.  Where would we be without bacon?

The best thing about corn chowder?  It is one of those one dish meals and that's never a bad thing.

When all is said and done this is a good, hearty, thick corn chowder.  The sweetness of the corn is enhanced by roasting the corn first.  I could tell something was different with this corn chowder too, probably the cheddar cheese I added.  I think next time I will add more bacon to get more of a smoky flavor, which is never a bad thing either. 

The second best thing about corn chowder?  Leftovers later this week, never a bad thing.


Jock's Roasted Corn Chowder
Ingredients
1/2 pound of bacon, cut into 1/2” pieces
1/3 cup butter
1/3 cup of olive oil or bacon drippings
2/3 cup all-purpose flour
7 cups milk
4 large ears of corn on the cob
4 large baking potatoes, peeled an cubed (about 4 cups)
1 leek, cleaned and sliced, white part only
3 cloves garlic. minced
1 medium onion, diced
1 -1/4 cups shredded cheddar cheese
1 cup (8 ounces) sour cream
1/2 cup parsley
1/2 teaspoon salt, plus more for seasoning
1/2 teaspoon pepper, plus more for seasoning

Instructions

Preheat oven to 350 degrees. Wrap corn in tin foil and roast in oven for 35 minutes. Remove from oven and after cooled cut corn from the cob and set aside for later.

In a large dutch oven cook bacon until browned, remove bacon and set aside for later. Add butter, oil. leeks, onion, garlic, salt and pepper. Cook garlic and leeks for 5 minutes. Add flour and stir until smooth light blonde color. Gradually add milk and stir until thickened. Add potatoes and simmer for 40 minutes or until potatoes are tender. Add corn, cheddar cheese, sour cream, and bacon (reserve some for garnishing) and stir until cheese is melted. Add parsley and salt and pepper to taste.

Serve and garnish with remaining bacon.

Sunday, December 6, 2009

Cranberry Pancakes with Cranberry Maple Syrup


If you follow me here or Facebook you know I like my pancakes.  We don't eat them for breakfast we eat them for dinner, unless I'm at big sis's then we eat them for breakfast.  I've tried different types, plain, whole wheat, blueberry, banana and pumpkin but since it is holiday time I got this brilliant idea to try cranberry pancakes.  But I didn't stop there I thought as along as I'm at it (and I have cranberries left over anyway) why not make some cranberry maple syrup.

First let's get the cast of characters out of the way.....


Like said above I have tried all kinds of different pancakes (by the way banana is my personal favorite) and different combinations of flour.  As good as pancakes are using plain old all purpose flour I found by mixing in 50% whole wheat flour most people don't even know the difference, and it's good for you too (well better for you than if you just use plain all purpose flour).  If you notice in the above pic the canister to the right and in the back, I keep pancake mixture (Alton Brown calls it "Instant Pancake Mix") around at all times so when I need it all I do is grab it and mix in the wet ingredients, it's a big time saver.  My pancake mix is adapted from Alton Brown's recipe with a couple of modifications.  Oh I used to use the store bought pancake mix and even made some mix myself (with very limited success) but until I watched Alton Brown of Good Eats in his Flap Jack Do It Again episode I never really understood how a good pancake was made.  If you really want to learn how to make a good pancake I urge you to watch the video, it changed my pancake world forever.

Most fruit when cooked in pancakes is introduced raw but I was afraid if I did that with cranberries they would turn out tart and only partially cooked.  I decided to cook the cranberries first and then fold them into the pancake mixture.  I wanted to try and keep the cranberry as whole as possible so when they started to burst I pulled them off the stove.  I let cranberry mixture cool down before I introduced them to the pancake mixture so they wouldn't start cooking the pancakes before I wanted to cook the pancakes.

Now that everything is assembled all that's left to do is cook the pancakes.  I have learned with my stove (gas by the way) I have to cook my at a medium low temperature to get the pancakes cooked through without burning the outside.  I also find that it takes about 5 minutes on the first side and approximately 3 minutes on the second side to cook properly.  I also use a cast iron griddle that I set over two burners, although this time I used cast iron skillets to cook the pancakes.  No real reason I did that I was just trying something different.  I think the main goal here is to use a heavy bottom pan or griddle to help spread out the heat more evenly.

In the end the cranberry pancakes turned out beautifully, no tart cranberry flavor just sweet cranberry goodness.  And then to top it off with the easy to make cranberry maple syrup will put you in heaven.  These pancakes will definitely join our pancake rotation in the fall when we can find fresh cranberries. 


Cranberry Pancakes with Cranberry Maple Syrup
Ingredients:
For the cranberry mixture:
1/2 cup fresh squeezed orange juice
1/2 cup sugar
1/4 teaspoon cloves
1 cinnamon stick, halved
1 1/2 cups fresh cranberries (or defrosted if frozen)
3/4 cup dark brown sugar
1/2 teaspoon ground cinnamon
1 cup chopped, toasted pecans
1 teaspoon orange zest
1 teaspoon vanilla

For the pancakes:
1 cup all purpose flour – sifted
1 cup whole wheat flour – sifted
1/2 teaspoon baking soda
1 teaspoon baking powder
1 teaspoon salt
1 tablespoon sugar
2 eggs
2 cups buttermilk
2 tablespoons melted butter

For the cranberry maple syrup:
2 cups maple syrup
1 cup fresh cranberries

Directions

For the cranberry mixture combine all the above ingredients except the cranberries in a saucepan and bring to a boil. Stir to dissolve the sugar. Add the cranberries. Reduce the heat to a simmer and cook until the berries burst, about 8 minutes. Remove from the heat and let the berries cool. Remove the cinnamon stick.

Preheat the oven to 200 degrees.

For the pancakes combine all the dry ingredients in one bowl and all the wet ingredients in another. Whisk dry ingredients together and then whisk wet ingredients well. Pour wet ingredients over dry and mix to the count of 10. Gently fold in the cranberry mixture from above.

For the cranberry maple syrup add maple syrup and cranberries to a sauce pan and bring to a boil, reduce heat and simmer until cranberries burst. Remove from heat and let cool.

Heat stove top or griddle to medium heat or 350 degrees. Wipe with butter or spray with light coating of non-stick spray. Pour approximately 1 cup of pancake mixture on griddle and cook until golden brown on first side. Flip over and cook for another 2-3 minutes or until golden brown. Place in warm oven until ready to serve.

Friday, December 4, 2009

Pumpkin Flavored Milkshake


As I promised I said I would do a recipe with pumpkin.  I like pumpkin but not like big sis, she is a fanatic about it.  I think the best pumpkin anything I ever had was a couple of years ago in the Upper Peninsula of Michigan when I bought some pumpkin fudge from one of those little fudge shops on the main street of Houghton.  In fact that just might be the best fudge I ever had, it was soooooo good.  If I remember we were lucky and got the last of what they had for the year.

I didn't make pumpkin fudge, since I am not a baker, but I decided to make a pumpkin milkshake. I originally came across the idea from searching through web sites one night and saw a picture and thought that might be pretty good and since it looked simple enough I decided to give it a go.  I came across a lot of recipes for pumpkin shakes, all about the same, but finally decided on the one below. 

The cast of characters is fairly simple........

One different idea I found in another recipe was instead of using graham crackers was to use ginger snaps. 

There is one character in this cast I want to introduce you to that deserves mention......

This is the absolute best vanilla ice cream you can buy.  Aldens Ice Cream is made with  real cream, real, honest to goodness cream with real honest to goodness vanilla bean specs throughout.  This vanilla ice cream is good all by itself.  We find it at Whole Foods Market, I'm not sure if it is available anywhere else.

As far as making the milk shake it pretty simple, put everything, except the graham crackers, in a blender and blend it all together.  Crush up the graham crackers on top and insert a swizzle stick, in this case a cinnamon stick.

Pumpkin Flavored Milkshake
(Printable Recipe)
1/2 cup pumpkin, canned or homemade
1/4 cup milk
1/4 teaspoon vanilla
1/2 teaspoon cinnamon
1 pinch cloves
1 pinch nutmeg
2 tablespoons light brown sugar
2 cup vanilla ice cream
1graham cracker.
1 cinnamon stick for garnish.

Directions:
Put everything but graham crackers and cinnamon stick in a blender. With the normal household blenders it works best if the ice cream is soft.

Sprinkle with crushed graham cracker crumbs and add cinnamon stick before serving.

Wednesday, December 2, 2009

Pasta Carbonara


CATION: DO NOT READ UNLESS YOU ARE READY TO GAIN 2 POUNDS!!

The surgeon general should require that label be put on all Pasta Carbonara recipes.  I mean just look at the cast of characters for this episode.

Pasta, butter and bacon, how can you go wrong? 

I'll admit I have never had Pasta Carbonara but I have heard a lot about it and how good it its.  I used to work with a guy that said his wife made the best Pasta Carbonara in the world (but he said that about everything him or his wife cooked) and he got me interested.  It wasn't long after that I was cruising through Pioneer Woman's cooking  blog and came across her recipe for Pasta Carbonara.  It certainly sounded good, looked good and more importantly the comments people left said it was some of the best Pasta Carbonara they ever had.  I was sold, I had my Pasta Carbonara recipe. 

I did tweaked the recipe a bit by using ingredients I had on hand so I didn't have to go the store and the recipe at the bottom is how I made the Pasta Carbonara.  I used fresh thyme instead off parsley and of course I used some of that good Traders Joe's Pasta, lemon pepper this time.

This is really a pretty simple recipe to make and another bonus is it doesn't take very long.  I think the longest wait was for the bacon to cook.  While the bacon is cooking it gives me time to slice some garlic, lots of garlic, so much garlic you won't have any trouble with vampires for the night.

It is hard to beat the smell in the kitchen while cooking, bacon and garlic. Do they make a candle scent for that?  If not maybe they should.

My biggest worry making Carbonara is the raw eggs you mix the pasta with.  I guess the idea is to put the pasta in the egg mixture while it is still hot and it will cook the eggs and give a nice, thick, creamy mixture.  So how bad could it be anyway?  I once watched Rocky down some raw eggs while he was training for big fight so I figured a couple of raw or partially cooked eggs couldn't hurt me.  But as I found out the hot pasta will cook the eggs and all turns out fine in the end.

It sure did look good when I got done but the real test was yet to come, the taste testing.  It's hard to rate this recipe because I have never ate Pasta Carbonara before but I can tell you I liked it, liked it a lot.  I will definitely make this again, just not to often because I think I gained another 2 pounds writing this post.


Pasta Carbonara
Ingredients:
1/2 pound Smoky Bacon
8 oz. Linguine Pasta
1 whole medium Onion, diced
4 cloves Garlic, thinly sliced
1/2 cup White Wine (or Substitute Another 1/2 Cup Of Stock)
1/2 cup Chicken Stock
2 whole Eggs
3/4 Parmesan Cheese
1/4 stick unsalted Butter
1 Teaspoon fresh Thyme
½ to 1 Tablespoon Black Pepper

Preparation Instructions

Slice up bacon into pieces about one inch wide. Cook until browned and crisp.

Bring to as boil salted water and add linguine and cook until al dente, tender-firm.

After the bacon is cooked, remove it from the pan with a slotted spoon. Add the diced onions into the bacon renderings. Stir and cook over medium heat for 2 minutes.

Add the garlic and cook for 2 more minutes, remove from the pan and discard the bacon renderings.

Turn the heat up to high and as soon as the pan begins to smoke, pour in the white wine. Whisk until pan is thoroughly deglazed and add 1 cup of chicken stock. Return bacon, onion and garlic back to the pan. Turn heat down to medium and let simmer.

Crack eggs into a large bowl and add the Parmesan cheese and thyme. Leave a little Parmesan Mix well.

Drain the pasta being sure the pasta is very hot. Add the pasta to the egg mixture and then add the bacon/onion mixture, add butter and mix it all together well. Pepper to taste. Garnish with parmesan.

Monday, November 30, 2009

Scallops with Garlic Basil Linguine


Yippie kay yay the wife is gone and it is time for some seafood, well not yippie kay yay the wife is gone but YIPPE KAY YAY it's time for seafood.  It is a tough call which I like better shrimp or scallops, probably comes down to what day you ask me, some days I will pick shrimp and others scallops. 

When I lived in Wisconsin, or for the matter Michigan, fresh seafood was hard to come by.  There was a good seafood market in Sheboygan but they certainly didn't have the choices we have here in Maryland.  Here in Maryland I have choices, I can go to the Maine Avenue Fish Market in D.C or one of the local Whole Foods Markets.  The Whole Food Market is easier but if given the chance I go to the Maine Avenue Fish Market. 

This episode starts off with very few and simple cast of characters.

I chose the garlic basil linguine for this meal because 1) when I saw it at Trader Joe's a week a go it looked good and 2) it was already in my refrigerator (yes we keep our pasta in the refrigerator and don't ask me why because I can't tell you). 

We start by browning the scallops in the olive oil and butter.  To get the tasty caramelizing on the scallops make sure you dry them off before you put them in the pan because if you don't all they will do is steam.


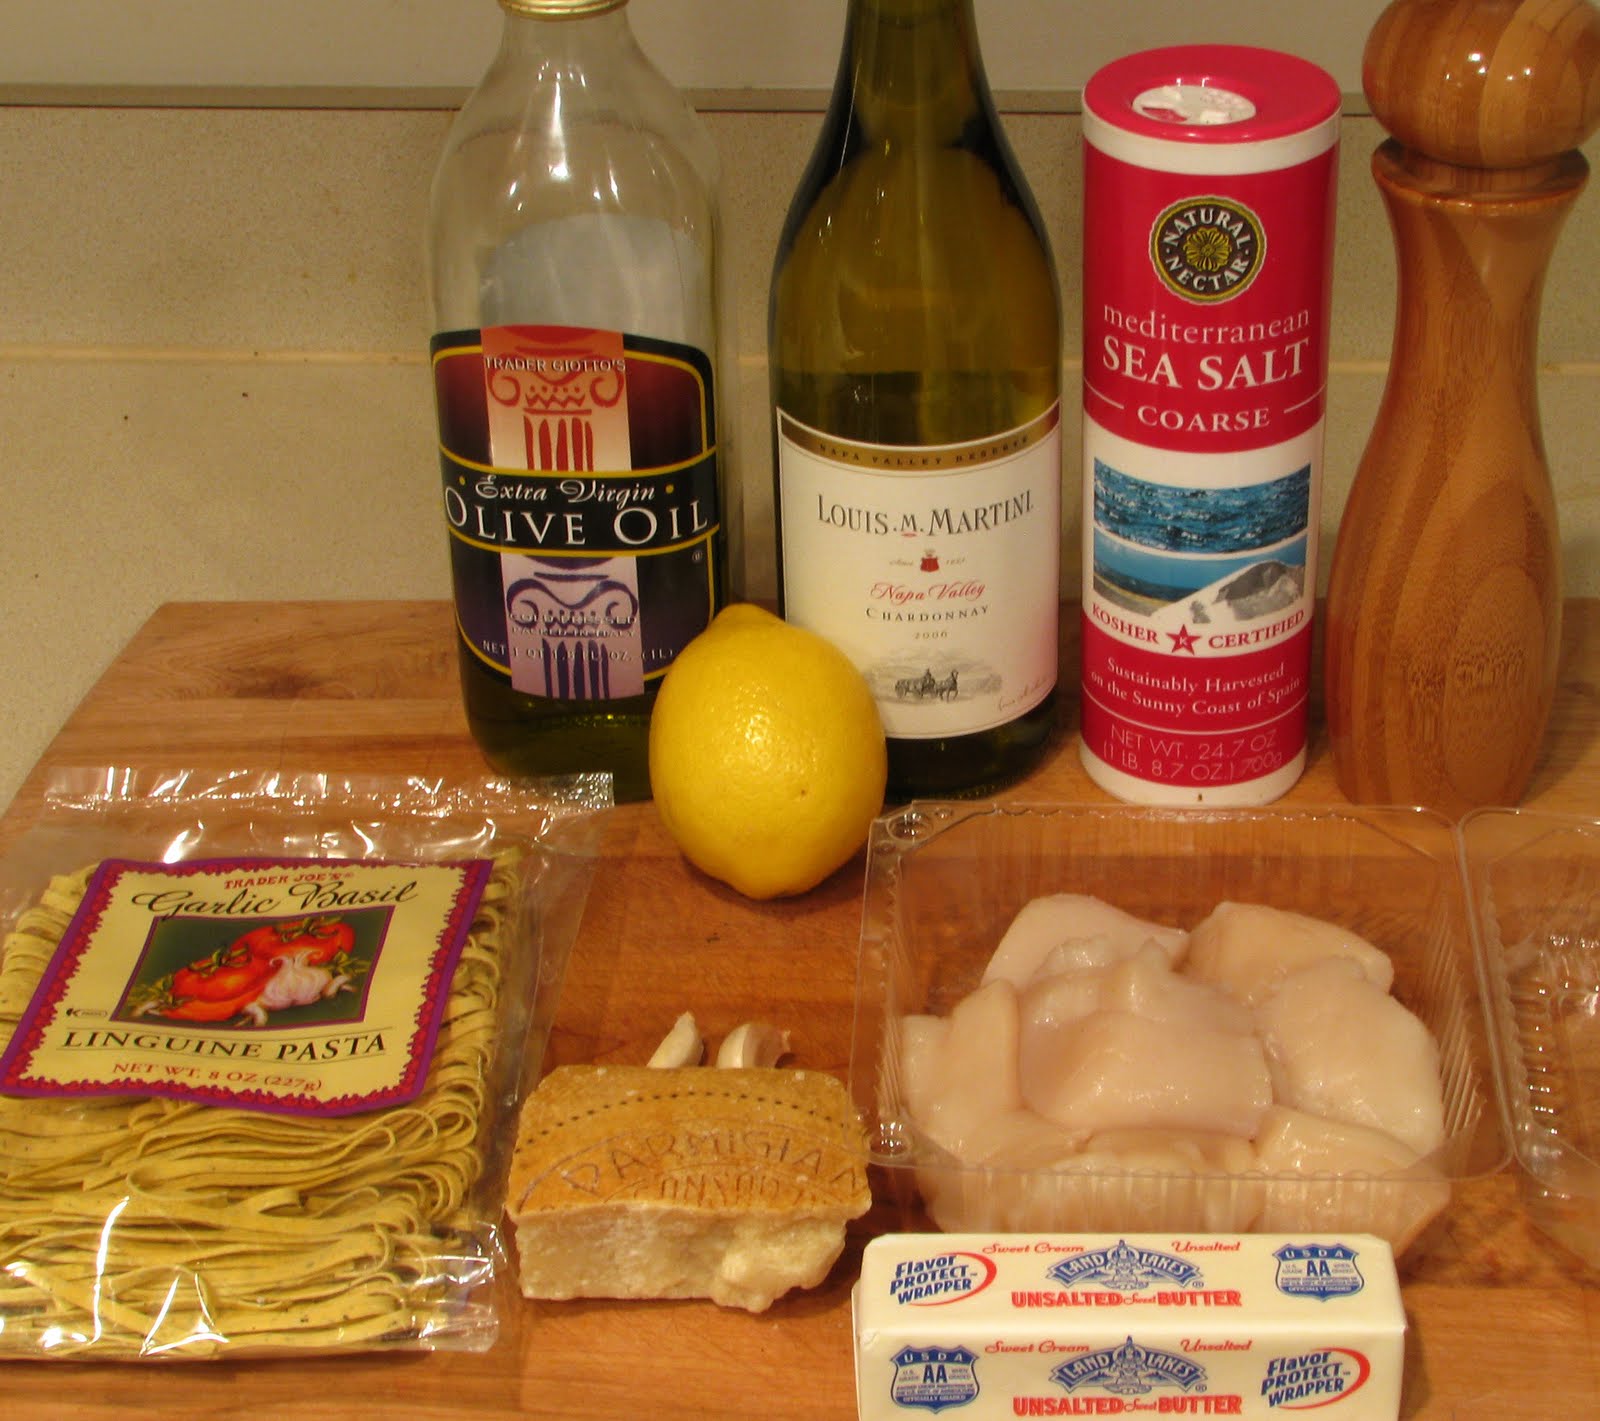
Once the scallops have the wonderful caramelizing on them it's time to remove them from the pan and deglaze the pan with a little white wine.  I'll be honest here and tell you I am not a wine drinker, if fact I can't stand the taste of the stuff but I do like cooking with it.  Tonight was a special because I got to open a new bottle of wine.  I use the wine to clean all those delicious brown bits of goodness off the bottom of the pan so you can pour it over the top of the scallops and finish them off with style.


Not only are scallops my favorite seafood item (at least for today)  I think they are my favorite type of food period.  The scallops have succulent sweet flavor unlike anything else you have ever eaten.  This particular meal had a hint lemon flavor (probably because I used lemon juice huh?).  I have to rate this meal a 5 out of 5 forks because after it is scallops and how can you go wrong with that.  I should mention the linguine from Trader Joe's was good too.  The basil flavor really came through the linguine and I could also taste a hint of garlic.  I would definitely use it again and I will probably use it in other meals as well.

Scallops and Linguine in White Wine Sauce
Ingredients
1 tablespoon unsalted butter
1 tablespoon olive oil
1 pound fresh scallops
8 oz. Linguine Pasta
2 cloves Garlic, thinly sliced
1/2 cup White Wine
1 fresh lemon
Salt and pepper to taste
Parmesan Cheese

Instructions
Bring to as boil salted water and add linguine and cook until al dente, tender-firm.

Preheat skillet over medium high heat. Add butter and olive oil. Add garlic and cook for 1 minute or until fragrant. Meanwhile dry off scallops and salt and pepper. Add scallops to skillet and cook for 2 minutes or until browned. Turn over and cook for 2 more minutes until cooked through being careful to not over cook. Use ½ of lemon over scallops and remove from pan.

Add white wine and deglaze pan, reduce for about 1 minute and add other half of lemon juice.

Start with linguine on plate, add scallops, pour reduced white wine from skillet over scallops and garnish with parmesan cheese.

Friday, November 27, 2009

Open Face Turkey Sandwich with Cranberry Bread


Well the big day finally arrived, the day when you can eat whatever you want and not feel guilty.  This is the real Thanksgiving, the day when food is king.  The wife and I had our Thanksgiving early this year because she was going back to Michigan to visit the little granddaughter while I decided to stay here and work, really, well not on Thanksgiving but the rest of the weekend.  Like everyone else I too had to plan my Thanksgiving meal but unlike most mine was already half made.  Yep I had leftovers from our Early Thanksgiving Dinner.  Instead of calling this Leftover Wednesday this week we can call it Leftover Thanksgiving it's just a day late and happens to be Thanksgiving. 

Since I am getting tired of posting Thanksgiving meals we are going to cruise through this entire meal in one post.  This is a warning because I have lots of pictures and two recipes down below ready for you to try.  So without further adieu let's roll.....

The first cast of characters we will start with today is the gravy.  Yeah I know I might have just lost some of my family because of their distaste of gravy but this gravy recipe is worth it. 

This is another recipe from the Tyler Florence cooking show we went to in downtown D.C. a couple of weeks ago and once again after I watched him make this I knew I had to try it.  If you read the recipe down below you will notice that recipe calls for roasting the turkey wing first but at his show he used smoked turkey wings, that's what caught my attention.  If you do use smoked turkey wings you don't have to roast them again (just thought I would throw that in there just in case you were wondering). 
The gravy is really pretty simple, start with cooking the veggies and herbs for a few minutes and then after that everything goes into the pot, just like cooking stock.  One other change I should note is when Tyler cooked this gravy at his show he used chicken broth instead of water like the recipe below.  I used some of my special homemade chicken broth I made about a month ago along with a little water.  I wasn't too worried about having extra broth left over because I can always find uses for it.  From here it was time to watch some football and let this simmer away on the stove for about 2 hours.

After a couple of hours I strain all the extras out and then use my gravy separator to get rid of the fat.  Now this can be set aside because we got other things to do and introduce another cast of characters.


I'll admit if you look at the above pic and look at the recipe below you will notice not all the characters are in the photo.  The problem was I had a recipe for cranberry bread I had found on a blog that sounded pretty good but when I got everything mixed together something didn't seem right.  The batter (for all you bakers out there is that what they call it)  seemed real dry.  This was heading for disaster real quick.  What to do, what to do?  Quickly I went to the Food Network website and went to my recipe box (if you don't know you can keep your own recipe box on the Food Network website) where I had saved a cranberry bread recipe from Emeril.  Sure enough Emeril's recipe called for much more liquid than the one I was using.  Time to adapt, overcome, persevere and I did just that.  Like I said above I had already started with one recipe so what I did is combine Emeril's recipe with what I already started.  My recipe below is the results.

When everything was said and done it reminded me of pancake batter.  Hm-mm, I wonder?  Maybe another post for another day?  Let's wait and see.


Doesn't look to bad for a first timer now does it?  With all the drama involving the first batter I made I wasn't too sure what I was going to be left with in the end but so far this is looking like a loaf of bread.

Now that the cranberry bread is made we can get back to our turkey gravy.  We left off with our broth made and now it's time to finish the gravy.  The first thing to be done is to make a roux.  For you first timers out there a roux is nothing more than equal part fat (in this case olive oil and butter) and flour mixed together over medium heat.  Some people think you have to use a wooden spoon but I'm not sure that really matters but what does matter is to keep stirring until you get the color of roux you want (this is really important if you are making gumbo).

Now if you just hang with me a little longer we are almost finished.  To the roux we can now add the broth we made earlier with the smoked turkey wings until it gets to the desired thickness we want.

Here is where the leftovers come into play.  If you remember a couple of days ago I posted our main entree from our Early Thanksgiving Dinner, Sausage and Cranberry Stuffed Turkey Roll.

This is our chance to use the rest of the leftover turkey up.  I gently slide the turkey into the gravy we just made and let it take a 15 minute bath to warm it up a bit. 

We are almost there and this is the fun part, we get to put the whole thing together.  First we slice up some of the good looking cranberry bread up.


 Lay a couple of pieces (or more depending how hungry you are) on the plate and top with the warmed up turkey and gravy (pretty simple eh?).  Of course I am not done there I got a little side to put with it.  Remember Part I of our Early Thanksgiving Dinner?  If you need a reminder here it is....

Yep it's Jock's Cranberry Sauce, what a better way to compliment and Open Face Turkey Sandwich with Cranberry Bread.  Now everything is in its place and here is my Thanksgiving Dinner...

Mmm, mmm, now that's good grub. 

As far as ratings go I am giving Tyler's Turkey Gravy a hearty 5 out of 5 forks.  Simply put this is the best gravy I have ever ate.  The smoked turkey wings added a whole new depth of flavor to the gravy, something that just can't be duplicated by roasting the turkey wings.  If you ever decide to make this definitely find smoked turkey wings it will be worth it.

Now for the cranberry bread, it gets a 4 out of 5 forks only because I need to go back and follow Emeril's recipe a little closer next time.  If you notice I made the cranberry bread with raw cranberries mixed directly into the batter, Emeril cooks his cranberries first in his recipe and I think this may take out a little of the bitter taste my bread has when you bite into a cranberry.  It is only a slight bitterness so it really isn't too bad.  (And yes dear, I still have some cranberries left over so I can make you some cranberry bread when you get home because I know you will want to try it.) 

That pretty much does it for this Thanksgiving year and I think it is time to move on to other things.  I'm not sure where we will head but I have a couple of ideas like one more thing with cranberries and possibly something to do with pumpkin.

Stay tuned.

Jock's Cranberry-Pecan Bread

Ingredients:
1/2 cup fresh squeezed orange juice
1 cup sugar
1/2 teaspoon cloves
1 1/2 cups fresh cranberries (or defrosted if frozen)
1/2 stick unsalted butter, melted
2 large eggs
1 cup of unbleached flour
1 cup whole wheat flour
1/2 teaspoon baking soda
1/2 teaspoons baking powder
1/2 teaspoon ground cinnamon
1/2 teaspoon salt
3/4 cup buttermilk
1 cup chopped, toasted pecans
1 teaspoon orange zest
1 teaspoon grated ginger

Directions

Preheat the oven to 350 degrees F. Lightly grease a 9 1/4 by 5 1/4 by 2 1/2-inch loaf pan.

Combine the all the dry ingredients in a bowl and mix thoroughly. Add the wet ingredients together and mix thoroughly. Pour the wet ingredients onto the dry and mix together. Fold in the cranberries and toasted pecans.

Pour into the prepared loaf pan. Bake until a tester comes out clean, 55 to 60 minutes.

Turn out onto a wire rack to cool. Serve warm or at room temperature.

Turkey Gravy

Recipe courtesy Tyler Florence
Prep Time: 10 min
Inactive Prep Time - Cook Time: 2 hr 45 min
Level: Easy
Serves: 5 to 6 servings

Ingredients
2 pounds turkey wings
5 tablespoons extra-virgin olive oil
1 medium onion, halved
4 carrots, chopped
1 head garlic, smashed
2 sprigs fresh sage
2 sprigs fresh thyme
2 sprigs fresh rosemary
8 black peppercorns
2 tablespoons unsalted butter
1/4 cup all-purpose flour
Kosher salt and freshly ground black pepper

Directions
Heat the oven to 375 degrees F.

Put the turkey wings (also backbone and neck if you have it) into a small roasting pan and roast them until they are golden brown, about 30 minutes. Heat 3 tablespoons olive oil in a large stock pot over medium-high heat. Add the onion, carrots, garlic, herbs, and peppercorns and cook for 5 minutes. Add the turkey wings. Pour some water into the roasting pan and scrape up all the browned bits on the bottom; add this to the pot. Cover everything in the pot with cold water by 1-inch and bring to the boil, skimming any foam that rises to the surface. Reduce the heat and simmer for about 1 1/2 to 2 hours.

Strain out the solids and discard. Wipe out the pot and put it over medium heat. Melt the butter with the remaining 2 tablespoons olive oil and add the flour. Cook this roux, stirring frequently, until it is golden brown. Slowly whisk in the strained stock being careful to work out any lumps. Cook until the gravy has thickened, about 10 to 15 minutes.
Printed from FoodNetwork.com on Thu Nov 26 2009
© 2009 Scripps Networks, LLC. All Rights Reserved